Archive for the ‘Cursive’ Category
April 25, 2018
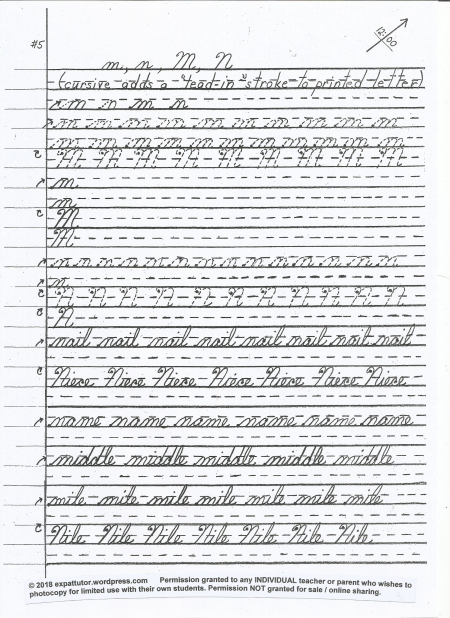
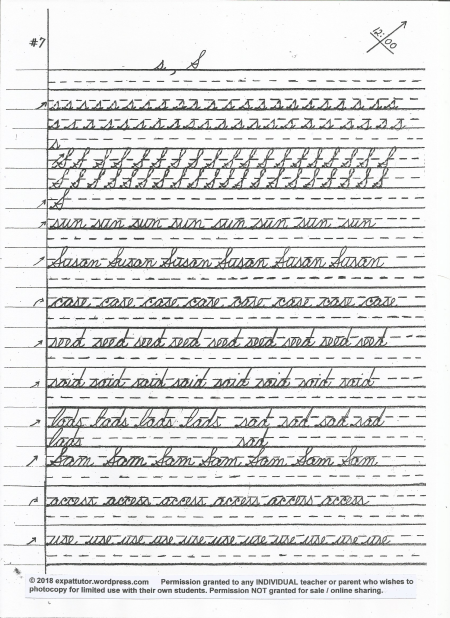
I have decided make and share some of my own scanned cursive worksheets (shared below). The first seven (in order) will appear in this post. Each worksheet builds on the ones before it, using only the letters in the current and earlier worksheets.
Worksheet 1 c, a, d (all lower case)
Worksheet 2 C, A, D (all upper case)
Worksheet 3 e, l (lower case) and E, L (upper case)
Worksheet 4 i, j (lower case), and J, I (upper case)
Worksheet 5 m, n (lower case) and M, N (upper case)
Worksheet 6 o, u (lower case) and O, U (upper case)
Worksheet 7 s (lower case) and S (upper case)
I am now in the process of writing up the remaining worksheets and will post them as they become ready.
These worksheets are presented in an order which enables students to begin writing in cursive successfully, almost from the very first day. I take the approach of teaching BOTH the small and capital forms of each alphabet letter, and immediately giving practice words using both. By mastering both forms, students immediately gain confidence in writing real words, friends’ names, and sentences.
On each worksheet (at the bottom) I have given permission for individual teachers and parents to print and photocopy the worksheets for use with their own students. However, I do not give permission for them to be sold, or shared directly with others, without taking them from this website.
t in the coming few weeks I will post the rest of the worksheets here, as they become ready.
I will be writing a series of posts with complete directions about how to use them. Just giving the worksheets to students to trace, without proper instruction first, will not produce the desired result. So the coming instructions will be important.
I’d be interested to know in the comments if you’ve found these worksheets helpful. Eventually I plan to compile all these worksheets and instructions into a book.
–Lynne Diligent


Posted in Cursive, Education, Handwriting, Penmanship, Teaching Creative Writing, Teaching Cursive Handwriting, Teaching Penmanship | 1 Comment »
December 27, 2017
My cursive series is about to continue.
So many schools seemed to have quit teaching cursive that I became depressed about continuing, and stopped writing the series.
Meanwhile, a number of teachers and parents have written to me asking me to continue. Furthermore, quite a few schools now seem to be starting up with cursive teaching again, and many teachers out there need help–especially since some teachers grew up without proper cursive mastery or instruction themselves.
Therefore, I will be continuing my series starting the first week of January, 2018, and will continue until it is finished.
–Lynne Diligent
Posted in Cursive, Education, Handwriting | 9 Comments »
January 8, 2016

Turn the paper while writing in order to get properly slanted cursive.

Correct positioning for left-handed writers to obtain the forward slant.
This post is both for parents and for teachers who may be called upon to teach cursive, but need help with how to teach the correct slant. For examples of correct slant, see this post.
The way to get a slant is to TURN THE PAPER (or notebook). Instead of having the paper directly upright in front of you, rotate it about 45° COUNTER-CLOCKWISE, so that the upper right corner is in the 12:00 position (and lower left corner is in 6:00 position). Then write normally on the page, and the writing will have the proper slant.
The paper should be turned on an angle to write for one’s entire life–it is the correct way–it is not something one does while learning as a child, and later on reverts back to using a straight paper. No one can write with a proper forward slant if the page is not turned on the desk
A helpful hint for teachers and parents is to cut a thin strip of paper (I used to use a 1/8th-wide strip cut from red construction paper, but any paper will do) and tape it to the desk or table where your student is working. The bottom edge of his paper should rest on that line. As a third-grade teacher, I taped these red lines on each desk before the first day of school. (I also did it when I taught Kindergarten for three years.) How did I get the idea? My own teachers did it when I was a child.

Line taped on edge of desk for slanted cursive writing.
If you would like to try the taped line method (highly recommended), here is how to put it in the right position:

It’s important to WATCH your own children or students work, for several weeks or months, until they develop the habit automatically. It feels very awkward at first since they have most likely learned incorrectly. They might need constant reminding every two or three minutes at first. As a teacher, it was easy for me to keep constant watch in the classroom and remind students all day long, “Turn your papers,” or “Papers on the red line.”

Once students start writing, there will naturally be some students whose writing is not slanted enough, and others whose writing is too slanted. At that point, tell those individual students to habitually turn their papers more, or less–whatever is required–in order to arrive at the correct amount of slant.

My hope is that these instructions will help parents and teachers understand how to teach cursive slant with excellent results.
Tags:creating a paper strip guide taped to the desk for cursive handwriting slant, help for teachers and parents for teaching cursive slant, teaching correct forward handwriting slant
Posted in Africa, Alaska, Algeria, American Culture, American Schools, Argentina, Australia, Bahrain, Bangladesh, Belgium, Belize, Bolivia, Brazil, Britain, British Schools, Canada, Chile, China, Colombia, Costa Rica, Cursive, Dubai, Ecuador, Education, Egypt, England, English Teaching, Expats, France, Germany, Greece, Handwriting, Hawaii, High School, Holland, Homework, Hong Kong, India, Indonesia, Intercultural, International Business, International Schools, Iran, Ireland, Israel, Italy, Japan, Jordan, Korea, Kuawit, Lebanon, Libya, Literacy, Macau, Malaysia, Mexico, Middle East, Netherlands, Pakistan, Palestine, Paraguay, Parenting, Penmanship, Peru, Portugal, Russia, Saudi Arabia, Schools, Science, Science Teaching, Scotland, Secondary Education, Singapore, South Africa, Spain, Student Motivation, Student Writing, Students, Sweden, Syria, Teacher Preparation, Teachers, Teaching, Teaching Cursive Handwriting, Teaching English, Teaching Writing Skills, Tunisia, Turkey, Tutoring, UK, Ukraine, United Arab Emirates, Uruguay, Venezuela, Vietnam, Wales | 5 Comments »
January 7, 2016

Why is cursive slant still important? American society still makes judgments about people based on their handwriting, and slant is one of the strongest criteria used. Most people make these judgments subjectively and subconsciously every day. However, employers and bank officers are just two examples of those in the power structure who employ professional handwriting analysts to make judgments about prospective employees and about people applying for loans.
In the photo above, I have written out some examples of various slants, as well as how they are perceived. As a teacher, when I introduce cursive writing, I actually write samples like this on the chalk board to show them to students, and explain what people might think about others based on the slant of their handwriting. So I encourage them right from the very first day that our goal is to try for an average forward slant, shown in the last example in the photo above.
One other example did not fit on the page, so here it is:

Our slant, like other aspects of our handwriting, will change from day-to-day, but we should generally try for a correct forward slant. This can be obtained by turning the writing paper 45° counterclockwise (subject of the post following this one, Part 7).
Countries and cultures, when compared with one another, also tend to have typical characteristics. For example, British “reserve” as compared with American “friendliness with strangers” can be seen in typical handwriting slants from each culture. Vertical, or even backslanted writing is more common in British culture than in American. If we move to North Africa, we find people generally suspicious and distrustful of others, and as expected, backslanted writing (in Western languages) is most common of all.
If you are from outside the United States, you should be all right using the slant which is most common in your own culture, and no one will judge you negatively. But if you are living or working in America, you should be very aware of this and of the impact it could have on your personal life or career with any of the undesirable slants discussed above.
My next post will explain, with photos, how to position the paper to get a correct forward slant.
In case anyone has had trouble reading the cursive in the photo, here is a typed version:
Cursive Slant for American Writing
In American culture:
A vertical slant is not considered desirable; you are judged to be too logical, too cold, and without feeling.
A backslant is to be avoided at all costs; you are judged to be emotionally suppressed, possibly with some kind of ecret emotional trauma in your background, difficult to approach,and someone who maintains a shell around themselves.
This is too much forward slant; these people are judged as being far too emotional, of making all of their decisions based on feelings.
This is the minimum acceptable forward slant.
This is an average/normal forward slant, which is considered most desirable in America. This slant, to Americans, indicates a balanced person who uses good judgment between logical decisions and emotion in their decision-making.
A variable (frequently changing) slant indicates moodiness, instability, and a frequently changing picture of oneself, as well as trouble making decisions.
Tags:applicants are judged on their cursive handwriting when applying for loans in a bank, how to introduce the idea of slant when teaching cursive writing, is cursive slant important, people are judged on cursive slant in the workplace by employers, which cursive slant is most acceptable in America
Posted in Africa, Alaska, Algeria, American Culture, American Schools, Bangladesh, Belgium, Belize, Bolivia, Brazil, Britain, British Schools, Canada, Chile, China, Colombia, Costa Rica, Cross-Cultural Misunderstandings in Education, Cursive, Dubai, Ecuador, Education, Egypt, Elementary Education, England, English Teaching, Enhancing Teaching Skills, Expats, France, Germany, Greece, Handwriting, Hawaii, Home Schooling, Homework, Hong Kong, India, Indonesia, Intercultural, International Business, International Schools, Iran, Ireland, Israel, Italy, Japan, Jordan, Korea, Kuawit, Learning Disabilites, Lebanon, Libya, Literacy, Macau, Malaysia, Mexico, Middle East, Netherlands, New Zealand, Pakistan, Palestine, Parenting, Penmanship, Peru, Portugal, Russia, Saudi Arabia, Schools, Scotland, Secondary Education, South Africa, Spain, Student Behavior, Student Writing, Students, Sweden, Syria, Teachers, Teaching, Teaching Cursive Handwriting, Teaching Writing Skills, Thailand, Tunisia, Turkey, Tutoring, UK, Ukraine, United Arab Emirates, Uruguay, Venezuela, Vietnam, Wales | 1 Comment »
April 3, 2013

Cursive – the new undecipherable secret code script!
Cursive was taught in my school until four years ago. When I left, the school discontinued it as a regular subject. Now those students are in upper elementary and early middle school, and can neither read nor write in cursive writing.
Among my tutoring students, several of them have expressed to me their sadness that their older brothers and sisters can read and write in cursive, and they cannot. Still being in the first few classes not to learn cursive, they feel babyish and incompetent. Perhaps in subsequent years, this embarrassment will disappear when none of the new students have older brothers and sisters who know cursive, when they don’t. In another six or seven years, no one will know it, and it will seem normal to upcoming students. It’s only those in these transition years who will feel the loss. But they will feel it for the rest of their lives.
How many adults remember the childhood feeling of waiting to learn “grown-up” writing, or scribbling to other young friends (at the age of five or six) on a paper and bragging, “I know how to write in cursive?” Of course, at that age, no one knew, so your friends believed you, because they couldn’t read it, either!
When I tutor these students, I have to slow down and print (much more time-consuming). Of course these students also will never be able to read historical documents or even old family letters. Furthermore, most European and Latin American countries don’t teach printing at all–they teach only cursive script starting at the age of five. I feel this bodes poorly for a future globalized world.
I’d be happy to teach cursive to these students (being an expert cursive teacher), but that is not what I’m being paid to tutor in–we generally spend the time on math, science, reading, and writing. Furthermore, teaching cursive at an older age can be done, but it is not generally enjoyable as it is for children. It makes children feel grown-up, and they enjoy learning it.
–Lynne Diligent
Posted in Alaska, Algeria, American Culture, Argentina, Australia, Bahrain, Bangladesh, Belgium, Belize, Bolivia, Brazil, Canada, Chile, China, Colombia, Costa Rica, Cross-Cultural Misunderstandings in Education, Cursive, Dubai, Ecuador, Education, Egypt, Elementary Education, England, Expats, France, Germany, Greece, Handwriting, Holland, India, Indonesia, Intercultural, International Business, International Schools, Iran, Ireland, Italy, Jordan, Korea, Kuawit, Learning Disabilites, Lebanon, Libya, Macau, Malaysia, Mexico, Middle East, Netherlands, New Zealand, Pakistan, Palestine, Paraguay, Parenting, Penmanship, Peru, Portugal, Reading, Russia, Saudi Arabia, Schools, Scotland, Secondary Education, Singapore, South Africa, Spain, Student Behavior, Student Motivation, Student Writing, Students, Syria, Teacher Preparation, Teachers, Teaching, Teaching Cursive Handwriting, Teaching Geography, Teaching History, Teaching Science, Teaching Social Studies, Teaching Values, Teaching Writing Skills, Technology, Thailand, Tunisia, Turkey, Tutoring, UK, Ukraine, Uruguay, Venezuela, Vietnam | 5 Comments »
January 20, 2013

Several years ago, while teaching third grade, the school asked me to have students write stories. One of my third-grade boys (age 8) wrote a story unlike any I have ever seen in all of my years of teaching. Instead of writing about the usual kinds of stories which children do, he wrote about his experience as an adult man during war.
His story was about trying to save his family while he was being called off to war. He was rushing to hide them in the basement and get them necessities, while trucks of soldiers were coming by to pick him up and take him with them off to war. It was in Europe, and there were trucks. It’s been several years, and I no longer recall all the details, but the essence of the story has stayed with me ever since. Out of all the stories my students wrote over the years, it is the only one I can clearly remember today.
As someone who believes in reincarnation, I’ve always wondered if, in fact, this child’s story was a past-life memory. It was shocking to read. It sounded like one of the World Wars. His concerns sounded just as if an adult man of 35 was speaking about his feelings. There are a number cases now researched and published of young children who remember past lives, and even past lives in wars.
I mentioned the story to his mother, and she responded, “I know. He’s just like an old man, in a little boy’s body.”
–Lynne Diligent
Tags:boy remembers his past life and family in the War, student writes about past-life experience
Posted in Africa, Alaska, Algeria, Argentina, Australia, Bahrain, Bangladesh, Belgium, Belize, Bolivia, Brazil, Britain, Canada, Chile, China, Christianity, Colombia, Costa Rica, Criminal Behavior, Cross-Cultural Misunderstandings in Education, Cursive, Cyberbullying, Dubai, Ecuador, Education, Egypt, Elementary Education, England, English Pronunciation, English Teaching, Etiquette, Expats, France, Francophone Countries, Germany, Greece, Hawaii, High School, History Education, History Teaching, Holland, Hong Kong, India, Indonesia, Intercultural, International Business, International Schools, Iran, Ireland, Israel, Italy, Japan, Jordan, Korea, Kuawit, Lebanon, Libraries, Libya, Literature Teaching, Macau, Malaysia, Mexico, Middle East, Morality in Teaching, Netherlands, New Zealand, Pakistan, Palestine, Paraguay, Parenting, Peru, Portugal, Reincarnation, Religion, Russia, Saudi Arabia, Schools, Science Teaching, Scotland, Secondary Education, Singapore, South Africa, Spain, Student Behavior, Student Motivation, Student Writing, Students, Teachers, Teaching, Teaching Creative Writing, Teaching English, Teaching Geography, Teaching History, Teaching Writing Skills, Thailand, Tunisia, Turkey, UK, Ukraine, United Arab Emirates, Uruguay, Venezuela, Vietnam, Wales | 4 Comments »
August 1, 2012

The Handwriting without Tears curriculum is currently being implemented in many schools throughout the United States. Is it a good program? I have been asked to give my opinion.
I am an expert teacher of handwriting, and have over 20 years of experience in teaching both printing and cursive at both the Kindergarten and Grade Three levels. So the opinions below are my impressions from what I can gather about the program from the Handwriting without Tears website and from online information (at present I live and teach overseas, and have not seen or used the program myself, nor ever heard of it, before being asked for my opinion).
This Program Directly Addresses a Major Problem
One of the main problems with teaching handwriting (both printing and cursive) is that most current teachers have never had any instruction themselves in how to teach these skills. This program takes students from Pre-Kindergarten through Fifth Grade. It appears that the program is well-thought-out in terms of appropriate motor skills for preschoolers. Specifically, it appears that the program TEACHES THE TEACHERS HOW TO TEACH IT.

In order to teach cursive writing well, teachers need to be more competent and confident in their skills than this
It is not so important which program is used in teaching handwriting (although I personally found D’Nealian more difficult than other styles to teach well). The important thing is, does the TEACHER feel confident in his or her own handwriting skills, and with the methods to be used in communicating and practicing those skills with students? These days, most teachers do not feel confident with these skills (either because they were never taught as students themselves to the point of mastery, or because they had no instruction in how to teach it, and they don’t remember it from when they were young). This program DIRECTLY addresses these problems, which I would say is a big plus.
The other big plus with this program is that all teachers in the same school are being trained in use of the SAME program. It can be frustrating and confusing for students when they go from class-to-class, and each new teacher has a completely different type, standard, method, and approach to teaching handwriting. So this factor is especially helpful for students.
Handwriting Standards By Grade Level
This programs sets in place standards to be achieved between Kindergarten and Fourth Grade. Frankly, these standards do look a bit low to me, speaking as a veteran teacher of many years. However, their video (on home page) mentions that the program only takes ten minutes a day. Looking at it from this perspective, the standards are good.
Writing Style

Printing Style for “Handwriting without Tears” (as found on the internet).
This printing style is the same as traditional printing, as it was taught before D’Nealian style (slanted, with tails on the ends of letters, which most probably CREATED all the handwriting “tears”). This vertical block printing is both the most legible, easiest to master for the student, and easiest to teach for the teacher.

Desk strips in the new “Handwriting without Tears” cursive style.
I do not like the new Handwriting without Tears cursive style at all; in fact, I find it quite ugly. It is completely vertical, and devoid of both lead-in strokes or tails (lead-in strokes are used in the traditional cursive methods, while tails replaced lead-in strokes in more recent methods such as D’Nealian). My thoughts are that the vertical style was adopted in this method to do away with the need to turn the paper. Slant is not very difficult to master on a sheet of paper, but is nearly impossible in a workbook, such as is used in this program (and other recent programs). No doubt a simplified style was adopted to help students with dysgraphia.
Conclusion

In recent years, it seems that the major problem in teaching handwriting has not been whether the students learn cursive at school; it has been whether the students’ writing is legible at all!
Speaking as a veteran expert cursive (and printing) teacher, looking through the program, it seems very expensive with many unnecessary bells and whistles (expensive manipulative and workbook materials and expensive workshops). None of these things are at all necessary to teach cursive effectively.

Preschool manipulatives for the Handwriting without Tears program.
For teachers who have no idea how to teach cursive, and who have never been taught, this program does offer good support. The use of manipulative materials can be fun for students and give new teachers of handwriting confidence in what they are doing. (I was fortunate to recall how I was taught as a child; I also had the support of another cursive teaching expert, a generation older than myself, who still happened to be teaching in the same school).
Overall, I would come down in favor of this program because it addresses the following issues:
1.) Handwriting instruction IS being given to students, with a focus on at least achieving legibility.
2.) Teachers ARE being given good support and training.
3.) The program seems to be well-thought-out over several years, and all teachers in the same school are being asked to use the same teaching methods, and same style of printing and cursive.
4.) The program maintains an emphasis on the positive and fun aspects of handwriting, with students and parents, through use of manipulatives, and by working only ten minutes a day (according to the video.
–Lynne Diligent
Tags:cursive writing in elementary school, handwriting standards by grade level, Printing in preschool, pros and cons of "Handwriting without Tears", teaching printing and cursive
Posted in American Culture, Australia, Books, Britain, Canada, Cursive, Education, Elementary Education, England, Expats, Handwriting, India, Intercultural, International Schools, Ireland, Parenting, Penmanship, Scotland, Singapore, South Africa, Student Motivation, Students, Teacher Motivation, Teacher Preparation, Teachers, Teaching, Teaching Cursive Handwriting, Teaching Writing Skills, Uncategorized | 19 Comments »
September 7, 2011

Palmer Method
In some schools, teachers are told which form to teach (D’Nealian and Zane-Bloser are the most common current styles) with older teachers remembering and knowing the Palmer method.

Zaner-Bloser Cursive Chart
If no one is mandating which style you teach, then which style should you choose? The short answer is, it doesn’t matter. Choose whichever style you like personally.
If you are unfamiliar with different cursive styles, here is a great page which shows many different styles, and lists them by name (most of which have only slight differences).
Personally, I have a definite preference for either Zaner-Bloser or Palmer over D’Nealian. Most teachers either love or hate D’Nealian. (I hate it.) The main difference is less in in the final result than in the teaching method. But whichever method you choose, if you teach it well, the result will be just fine. All slanted styles are readable and acceptable. (Vertical styles are not acceptable in America, for reasons I will go into in a later post.)

D'Nealian Cursive (note the lack of lead-in strokes on the small letters, because D'Nealian uses the tail strokes to connect to the following letter, instead)
If you have school materials and desk tapes in a given style, stick to the style (because if you teach it differently from a wall chart or desk tape it will confuse the students). If you have no materials, it really doesn’t matter even if you slightly mix styles. If you don’t like one particular letter in a style (for example, I don’t like the capital W’s with rounded bottoms), then substitute a different style for that letter in your own cursive worksheets. Choose the letter styles you like, and practice them until you feel you can make them really well (including on the chalk board or white board while writing in front of students).
D’Nealian adds tails at the end of each letter which connect to the following. Traditional cursive methods instead add a lead-in stroke to each letter, which connects from the previous letter.
The problems I’ve encountered with D’Nealian are with correct letter formation. Because students being taught in manuscript (the D’Nealian slanted printing style) usually don’t get the slant right (because their teachers haven’t insisted they turn their books and papers since Kindergarten), what usually happens is that the students write vertically with big tails (which is all wrong). Thus, all the small l’s with tails look like capital L’s right in the middle of words. This is only one of the many problems I’ve found with D’Nealian.
It’s much easier (in my opinion) to get the correct slant by learning other traditional methods of cursive. In any case, teaching correct slant and turning of the paper will be dealt with in a subsequent post.
The next post will deal with writing the cursive masters.
–Lynne Diligent
Part 3: How to Prepare the Paper to Make Your Own Cursive Masters
Part 4: Making Decisions about In Which Order to Teach the Cursive Letters
Tags:D'Nealian adds tails at the end of each small letter to connect to the following letter, materials for teaching cursive handwriting, Palmer method cursive handwriting, problems with D'Nealian cursive handwriting, traditional handwriting methods use lead-in strokes in advance of the letter which connect them with the previous letter, Zane-Bloser cursive handwriting
Posted in Alaska, American Culture, Australia, Bahrain, Bangladesh, Brazil, Britain, Canada, Chile, Colombia, Costa Rica, Cursive, Dubai, Ecuador, Education, Elementary Education, England, France, Germany, Greece, Handwriting, Hawaii, Home Schooling, Hong Kong, India, Indonesia, Ireland, Israel, Italy, Japan, Jordan, Korea, Macau, Malaysia, Mexico, New Zealand, Pakistan, Paraguay, Parenting, Penmanship, Portugal, Russia, Saudi Arabia, Schools, Singapore, South Africa, Spain, Students, Teacher Preparation, Teachers, Teaching Cursive Handwriting, Thailand, Turkey, UK, Ukraine, Uruguay, Venezuela, Vietnam, Wales | 22 Comments »
September 6, 2011

Many possibilities exist for the order in which to teach cursive letters. So the question becomes, how to decide?
Should one teach small letters first, capital letters first, or a mixture of the two? Should letters be presented in the order of the alphabet, similar letters together, or those letters most-used to be learned first?
I taught cursive for many years, and made a number of sets of masters with letters taught in different orders each time. After a great deal of experimentation, here are my conclusions.
Teaching the small letters first, and capitals later (the most common system) often gives the result that many students never completely master the capitals. When this happens, students don’t ever feel completely confident with their cursive, and those students are the ones who are first to revert to printing in subsequent years.
I’ve even had teachers (in their 20s and 30s) tell me that this happened to them as children, so they never felt confident with their cursive, and are embarrassed to write on the board with it.
My recommendation is to teach similarly-formed small letters together. Teach the capitals of those same letters at the same time as the small letters, and give students immediate daily practice with these capitals. As my class masters just a few letters, I immediately make supplemental cursive masters with my students’ names on them. Students love learning to write the names of every student in the class with proper cursive capitals.
Over the years I’ve made several sets of cursive masters, with the letters in different orders. My objective this time was to give priority to the vowels so that as many real words can be written as soon as possible, even from the first day. This give tremendous pleasure and motivation to the learners. Here is my most recent planning list of cursive masters:

Planning Sheet for My Latest Set of Cursive Masters
My two priorities here were to get through the vowels as quickly as possible, in addition to grouping together similarly-formed small letters. Capitals for the same letters are added on the the worksheets at the same time. By the time I got to the last worksheet, there was only “z” left, which is why it is alone.
I would suggest making a worksheet of numbers and punctuation FIRST, rather than putting it at the end. I just forgot to do it that way this time, which is why it is the last worksheet. By including numbers, it’s easy to correct students’ writing of figures in math and on tests. By including punctuation, it helps to correct all the students who don’t have a clue where to start a comma on the line and pull downward, or the students who finish the top half of question marks and exclamation marks right down on the line, and place the period part actually below the line.
Any grouping you choose, as a teacher, will be fine. Just know in your own mind why you are choosing it. For example, the vowel “o” might make more sense to follow Worksheet 1 (c, a, d) in terms of formation, but since “e” is more commonly used in words, I chose to go ahead with “e” and “l” in Worksheet 2.
The next post will discuss which style of cursive writing to choose.
-Lynne Diligent
Part 1: What NOT to Do When Teaching Cursive in the Classroom
Part 2: Help for Teachers/Other Adults Who Need/Want to Learn Cursive on Their Own, or in Preparation for Teaching Cursive
Part 3: How to Prepare the Paper to Make Your Own Cursive Masters
Part 5: Which Form of Cursive Should I Teach?
Tags:choosing the order in which to group cursive letters on cursive masters, making cursive masters, should small cursive letters be taught first and capitals later, should the same small and capital cursive letters be taught together at the same time
Posted in Africa, Alaska, Australia, Bahrain, Bangladesh, Belize, Bolivia, Brazil, Britain, Canada, Chile, China, Cursive, Dubai, Ecuador, Education, Egypt, Elementary Education, England, Expats, France, Germany, Greece, Handwriting, Home Schooling, Homework, Hong Kong, India, Indonesia, Ireland, Israel, Italy, Japan, Korea, Mexico, New Zealand, Pakistan, Parenting, Penmanship, Peru, Portugal, Russia, Schools, Scotland, Singapore, South Africa, Spain, Student Motivation, Students, Teacher Motivation, Teacher Preparation, Teachers, Teaching Cursive Handwriting, Thailand, Tunisia, Turkey, UK, Ukraine, Uruguay, Venezuela, Vietnam, Wales | 5 Comments »
August 14, 2011

American / English wide-ruled notebook paper
This post will explain how to prepare the paper for making cursive masters which can be photocopied for students.
Not every teacher has access to cursive workbooks. In addition, there are some problems with the cursive workbooks, such as not being able to turn the book on the proper angle to write, without great difficulty.

Wide-ruled paper which has been cut, taped into a wider sheet, and photocopied for use as a cursive master
Take a sheet of wide-ruled paper (11/32 of an inch, or 8.7 mm spacing between horizontal lines) as in the top photo; or cut, tape, and photocopy two sheets of paper as in the second photo above, depending upon your preference. The second horizontal style is especially nice to use with younger children because it gives them a half-lesson to work on at each sitting, and seems less intimidating.

Dotted pencil lines are drawn at the midpoint between each ruled line
Next, take a ruler, and draw dotted PENCIL lines at the midpoint between each ruled line. It’s important to use pencil for two reasons. First, you can erase and correct any line which doesn’t come out quite right. Second, after you are satisfied with the lines, take a can of hairspray and spray it thoroughly. The paper doesn’t have to be soaking wet, but just be sure you cover all the pencil marks. This makes the lines permanent so that they cannot be erased. If you use pen or ink to make the lines, the hair spray will cause your dotted lines to bleed into the paper. This problem does not happen with pencil.
Now your master is ready to photocopy. Make approximately 30 photocopies, on which you will make cursive masters for various letters (and numbers). The next post will deal with how to write the cursive masters.
–Lynne Diligent
Other Cursive Posts by Lynne Diligent:
Part 1: What NOT to Do When Teaching Cursive!
Part 2: Help for Teachers/Other Adults Who Need/Want to Learn Cursive on Their Own, or in Preparation for Teaching Cursive
Part 4: Making Decisions about In Which Order to Teach the Cursive Letters
Tags:how to prepare cursive master sheets for students, on what kind of paper should English or American cursive be taught
Posted in Africa, Alaska, American Culture, Argentina, Australia, Bahrain, Bangladesh, Belize, Brazil, Britain, Canada, Chile, China, Colombia, Costa Rica, Cursive, Dubai, Ecuador, Education, Egypt, Elementary Education, England, Expats, France, Germany, Greece, Handwriting, Hawaii, High School, Home Schooling, Homework, Hong Kong, India, Indonesia, Intercultural, Iran, Ireland, Israel, Italy, Japan, Jordan, Korea, Lebanon, Libya, Macau, Malaysia, Mexico, Middle East, New Zealand, Pakistan, Palestine, Paraguay, Parenting, Penmanship, Peru, Russia, Saudi Arabia, Schools, Scotland, Secondary Education, Singapore, South Africa, Spain, Students, Syria, Teachers, Teaching Cursive Handwriting, Thailand, Tunisia, Turkey, Tutoring, UK, Ukraine, United Arab Emirates, Uruguay, Venezuela, Vietnam, Wales | Leave a Comment »


